

For a long time, I’ve imagined creating a root vegetable washer: a brush-lined bucket I could vertically slide each carrot or beet into while holding the greens. A little reflection revealed though, that this setup wouldn’t work for greenless roots. Online stores have countless iterations of rotating wooden-barrel washers, but I didn’t want an enormous, limited-use piece of power equipment for my small farm, so I created a model that fits the needs of my small community-supported-agriculture operation. The instructions for this root vegetable washer aren’t hard and fast—feel free to adapt the plans for your situation and available materials.
Step 1: Collect Materials
There are two key areas to focus on when you start to assemble your washer: the exterior container and conveyor-belt system. These choices will often drive your design, so map them out before gathering materials.
Exterior Container
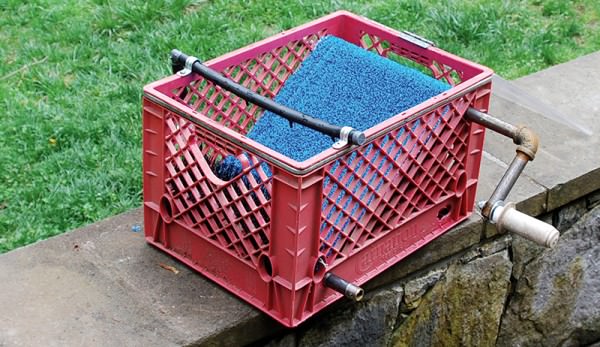
For a small-scale washer, I chose a rectangular container that’s strong and stable and lets the dirt and water wash through. A simple milk crate served my needs. Also consider using large, plastic storage containers (adding an exterior wooden frame for strength), various wooden crates, old stock watering troughs, industrial-sized sinks, custom-made boxes or even old bathtubs. Open-bottom containers can be placed over sinks, drains, compost bins or even small raised beds, so you can water as you rinse; closed-bottom containers can incorporate a drain and hose to direct the flow elsewhere and prevent puddling.
Consider attaching legs to the box for a comfortable, upright cranking position. Alternatively, latching or lashing the washer to a stable base—even well-anchored sawhorses—increases its versatility and storability.
Rollers & Conveyor Belt
As I began envisioning pieces that could serve as rollers, I started to see tubular items everywhere, analyzing them for suitability: closet hanger bars, paper towel holders, roller-
blind inserts. Ultimately, PVC pipe proved the best. The rollers should fit closely inside the exterior container while being secured on their axles through the side walls. The upper roller and handle must operate as a single unit that’s also separable for construction; threaded joints serve this purpose. The lower roller can spin freely but must be strong on its axle.
The conveyor belt needs to be flexible but strong, rough for dirt removal yet soft enough to not grate the carrots, and porous for water flow. Plastic-mesh gutter cover was ample at my local rebuilding center (it apparently doesn’t work well for its intended purpose), and I also considered vinyl-covered hardware cloth, discarded bamboo “screening fence” or roller shades, and burlap or synthetic-weave sacking. Astroturf won out: It’s inexpensive, easy to work with, tolerates wetness without rotting, and doubles as a brush. I found a loose-weave variety that was a garish blue.

I had on hand another ineffective gutter product: round brushes that insert and block debris from downspouts. These brushes are great for my root washer, though not necessary; you could also mount a push-broom head.
Step 2: Assemble Rollers & Crank
Measure the width of your box. Use this width to cut the PVC to length accounting for the endcaps, too—you want it to be close to the inside edges but with enough of a gap to be able to move. My box has a 12-inch opening and each cap has a 1/4-inch lip. So I cut my pipe just under 11½ inches so that when the caps were in the pipe, each roller was slightly shorter than 12 inches. I could hold the rollers in where they were to be placed to make sure they fit—I didn’t glue the caps into the pipe until I had assembled everything to make it easier to install other components. If you have a removable fourth wall, assemble it securely.
Step 3: Install Rollers
Screw small pieces of threaded metal pipe from the outside of your box through the wall into the threaded holes of the PVC endcaps. This creates axles for the rollers to rotate on. One roller should be placed high in the box and the other should be low on the opposite side, so the produce rolls and tumbles downward as you crank the washer. The sprayer will be positioned over the bottom roller, washing the roots as they tumble. Once the rollers are in place, measure the circumference of the installed rods—this will be the length of your belt.
Step 4: Cut & Connect Belt
Sew the ends of your belt material together to create a tube that fits around both rollers. I used my sewing machine, but if you don’t have one or are using heavier material, waxed dental floss or high-gauge wire makes strong thread. You can weave this through open mesh or hand-sew the ends with a heavy-duty sewing needle. (If you don’t have one, make it by hammering the end of a large nail flat and drilling a hole in it.)
Step 5: Add Grip To Top Roller
Screw sheetrock screws through the entire diameter of the PVC pipe to make points on the “drive” roller (the one up higher) to help grab and turn the belt, so it doesn’t slip. Alternatives include wrapping sandpaper or soft and squishy material, such as sponge or foam rubber, around the roller. Pointy nail plates or barbed wire wrapped around the roller can work, but make sure the points don’t protrude beyond the belt face.
Step 6: Install Roller & Belt
Insert the entire roller and belt apparatus into the washer box and screw in the outside axles tightly.
Make sure the crank handle will be on the side that is most comfortable for you and that it’s attached to the top roller. You’ll be cranking the belt away from the lower roller while gravity pulls the roots back down under the sprayer.
Step 7: Add Brush Roller (Optional)
Insert a brush facing the lower roller if desired. I used a gutter brush that has stiff wire in the middle. I cut it to fit the outside width of the milk crate, pulled out the outer bristles, and stuck the wires into the crate openings so it sits right above the lower roller. Other brushes, such as push-broom heads, could be attached to the back wall of the box.
Step 8: Assemble Watering Pipe
Depending on water flow, you can aim any number of sprays at the roots and attach microsprayers to soften the jet. For mine, the force of the water stream through a 1/4-inch pipe works; with a valve at the hose connection, I can control the flow for ample splash to wash the tumbling tubers.
Step 9: Attach Lid
If you want to attach a hinged half lid, it can be held closed over the climbing roots while you crank, and then flipped open as a slide for the veggies to be sent straight into a box or bin for distribution.
Step 10: Tumble Your Root Veggies
Gravity pulls the root crops down as the belt movement tries to pull them up, and you control the speed with cranking. As water sprays the roots, they tumble around the brush apparatus, and the dirt washes downward.
My tiny washer will hold and clean about 1 to 1½ pounds of new potatoes or a good pound or two of radishes or small carrots—without greens, obviously. It can accommodate between five to 10 beets, depending on their size, but probably not too many turnips or rutabagas. If you grow crops of larger roots, consider increasing at least double the project size.
This nifty device cuts my root washing time more than half, is easier and uses less water than my previous labor-intensive soaking and hand-washing method. It does a surprisingly good job, though I haven’t tried it for sunchokes yet—that will be the real test of its efficacy.
This article originally appeared in the July/August 2014 issue of Hobby Farms.
